..

Lua 逆向总结

Lua 逆向总的来说在 CTF 中好像并不是多么常见,印象比较深刻的可能就四次吧,第一次遇到是在 2022 年的RCTF,然后还有今年的巅峰极客、柏鹭杯和 N1CTF。分别是 luac 文件结构修改、LuaJITLua VM Opcodes顺序修改 、Lua VM Opcodes实现修改 ,基本上也概况了常见的情况了。

1. Lua 和 C 的基本交互

虽然 Lua 的源码称得上很小,但是全看还是没什么性价比,这里我们从CTF中常见的一种场景,C 语言调用 Lua 脚本中的函数开始分析,主要有这么几步:

  1. C 语言和 Lua 的交互是通过 lua_State来实现的,所以首先需要创建一个 lua_State

  2. Lua 脚本加载进 Lua 虚拟机,这里 Lua 提供了三个常用的函数

    LUALIB_API int (luaL_loadstring) (lua_State *L, const char *s);
    
    LUALIB_API int (luaL_loadbufferx) (lua_State *L, const char *buff, size_t sz, const char *name, const char *mode);
    #define luaL_loadbuffer(L,s,sz,n)	luaL_loadbufferx(L,s,sz,n,NULL)
    
    LUALIB_API int (luaL_loadfilex) (lua_State *L, const char *filename, const char *mode);
    #define luaL_loadfile(L,f)	luaL_loadfilex(L,f,NULL)
    

    当然,最后这三个函数最后走的都是 lua_load 函数,把经过编译(luac文件就不编译了)后的代码放在栈顶。

  3. 执行加载到栈顶的 Lua 代码,因为上述函数只是将程序加载到了栈顶,只有在执行了之后才能变成虚拟机中的函数、变量。由于代码已经在栈顶了,也没有需要传入的参数,所以只需要调用 lua_pcall 即可。

    int lua_pcall (lua_State *L, int nargs, int nresults, int msgh);
    

    对于步骤 2、3 Lua 中也提供了一套合并的函数,luaL_dofileluaL_dostring

  4. 调用指定函数。调用约定如下:

    首先把要调用的函数压入栈中,然后按顺序将要传入的参数压入栈中(从左到右),最后调用 lua_call (当然也可以调用 lua_pcall 等)。当函数返回时,所有的参数和要调用的函数以及被出栈了,而且函数调用的返回值被压入栈中了,返回值的数量就是传入的 nresults的值,除非传入的是 LUA_MULTRET

下面是一个简单的代码实现

#include <lua5.4/lauxlib.h>
#include <lua5.4/lualib.h>
#include <stdint.h>
#include <stdio.h>
#include <stdlib.h>

/*
    function add(a, b)
    	return a + b;
    end
*/
unsigned char luac_buff[] = {
    0x1b, 0x4c, 0x75, 0x61, 0x54, 0x00, 0x19, 0x93, 0x0d, 0x0a, 0x1a, 0x0a,
    0x04, 0x08, 0x08, 0x78, 0x56, 0x00, 0x00, 0x00, 0x00, 0x00, 0x00, 0x00,
    0x00, 0x00, 0x00, 0x00, 0x28, 0x77, 0x40, 0x01, 0x8a, 0x40, 0x64, 0x65,
    0x6d, 0x6f, 0x2e, 0x6c, 0x75, 0x61, 0x80, 0x80, 0x00, 0x01, 0x02, 0x84,
    0x51, 0x00, 0x00, 0x00, 0x4f, 0x00, 0x00, 0x00, 0x0f, 0x00, 0x00, 0x00,
    0x46, 0x00, 0x01, 0x01, 0x81, 0x04, 0x84, 0x61, 0x64, 0x64, 0x81, 0x01,
    0x00, 0x00, 0x81, 0x80, 0x81, 0x83, 0x02, 0x00, 0x03, 0x84, 0x22, 0x01,
    0x00, 0x01, 0x2e, 0x00, 0x01, 0x06, 0x48, 0x01, 0x02, 0x00, 0x47, 0x01,
    0x01, 0x00, 0x80, 0x80, 0x80, 0x84, 0x01, 0x00, 0x00, 0x01, 0x80, 0x82,
    0x82, 0x61, 0x80, 0x84, 0x82, 0x62, 0x80, 0x84, 0x80, 0x84, 0x01, 0x02,
    0xfe, 0x02, 0x80, 0x80, 0x81, 0x85, 0x5f, 0x45, 0x4e, 0x56};

unsigned int luac_buff_len = 130;

int main(int argc, char const* argv[]) {
    // 创建 luaState
    lua_State* L = luaL_newstate();
    // 加载 luac
    if (luaL_loadbuffer(L, luac_buff, luac_buff_len, "demo.lua") ||
        lua_pcall(L, 0, LUA_MULTRET, 0)) {
        exit(-1);
    }
    // 调用函数
    lua_getglobal(L, "add");
    lua_pushnumber(L, 100);
    lua_pushnumber(L, 200);
    if (lua_pcall(L, 2, 1, 0) != LUA_OK) {
        exit(-1);
    }
    // 获取并移除返回值
    int sum = lua_tonumber(L, -1);
    lua_pop(L, 1);
    printf("sum = %d\\n", sum);
    return 0;
}

其中还有一些细节,比如 lua_tonumber(L, -1) 中 index = -1 代表的是栈顶,这里正索引表示绝对堆栈位置,从 1 开始,作为堆栈的底部;负索引表示相对于堆栈顶部的偏移量,详细可以参考官方文档的 4.1 节。

参考:

  1. Lua5.4 Reference Manual Part4
  2. C程序优雅地调用Lua?一篇博客带你全面了解 lua_State

2. Luac 文件结构修改

2.1 Lua 代码加载流程分析

因为我是比较喜欢 luaL_loadbufferx,所以我们还是从 luaL_loadbufferx 开始分析。整体流程如下:

luaL_loadbufferx -> lua_load -> luaD_protectedparser -> f_parser -> luaU_undump ( luac 二进制文件) | luaY_parserlua 脚本文件,这个还没见过改的,也没看过)

整个流程代码太多了,贴出来也没什么意义,需要注意的也就从 luaD_protectedparser 调用 f_parser 是用 luaD_pcall 调用的,而不是直接调用的。一般做题目,研究这个流程也就是为了顺利跟到 luaU_undump 这个函数,进而分析 luac 文件结构修改了哪部分,是不是中间存在什么加密或者字段顺序上的调整。

2.2 通杀方法

对于这种文件结构上的调整,这里我们有一个通杀的方法,那就是在 load 完成之后,执行之前(此时加载后的程序位于栈顶),调用同版本的、标准的(也就是未经任何修改的)lua_dump 函数,即可得到标准格式的 luac文件。简单来说,先用题目给的 load 然后用标准的 dump

这里以 2022 年 RCTFpicStore 作为例子, 首先 Lua 的版本为 5.3.3,(直接 shift + F12 就搜索就行),先编译一个官方的,这里为了方便 dump 添加一个导出函数

static int my_writer(lua_State* L, const void* p, size_t size, void* u) {
 return (fwrite(p,size,1,(FILE*)u)!=1) && (size!=0);
}

LUA_API int luaL_dumpfile (lua_State *L, const char *filename) {
  TValue *o;
  FILE* D;
  int status;
  if (!filename || !(D = fopen(filename,"wb"))) {
    return -1;
  }
  lua_lock(L);
  api_checknelems(L, 1);
  o = L->top - 1;
  if (isLfunction(o))
    status = luaU_dump(L, getproto(o), my_writer, D, 0); // 这里不直接调用 lua_dump 函数,因为可能会调用到程序本身的
  else
    status = 1;
  lua_unlock(L);
  fclose(D);
  return status;
}

然后修改一下 src 目录里的Makefile 编译个 so 出来,

  1. 创建个变量 LUA_SO= liblua.so,位置随便
  2. CFLAGS 后面加个 fPIC
  3. ALL_T 后面把 $(LUA_SO)加上
  4. 写一下LUA_SO的编译参数
$(LUA_SO): $(BASE_O)
	$(CC) -o $@ $(LDFLAGS) -shared $(BASE_O) $(LIBS)

重新 make 一手,拿到 liblua.so,这里Hook操作还是使用 Frida

var liblua = Module.load("/home/s1nk/CTF/rev/FridaCode/liblua.so");
var pfunc_dumpfile = liblua.findExportByName("luaL_dumpfile");
var func_dumpfile = new NativeFunction(pfunc_dumpfile, "int", ["pointer", "pointer"]);

var picStore = Process.findModuleByName("picStore");

Interceptor.attach(picStore.base.add(0x4D700), { // luaL_loadfilex func_addr
    onEnter: (args) => {
        console.log("luaL_loadfilex called");
        this.L = args[0];
    },
    onLeave: (retval) => {
        func_dumpfile(this.L, Memory.allocUtf8String("/home/s1nk/CTF/rev/FridaCode/dump.luac"));
    }
})

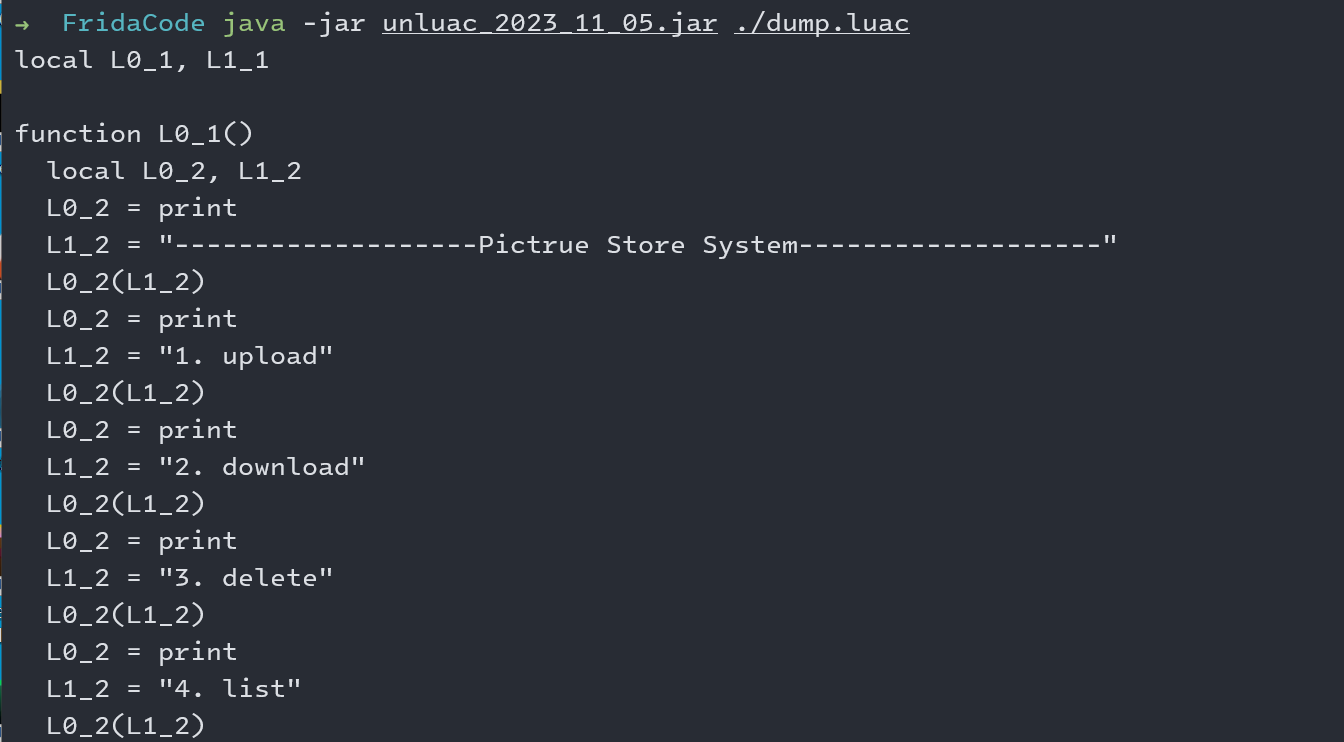
直接启动 frida -l ./lua_dump.js -f picStore ,然后就会发现,标准格式的 luac 已经出现了
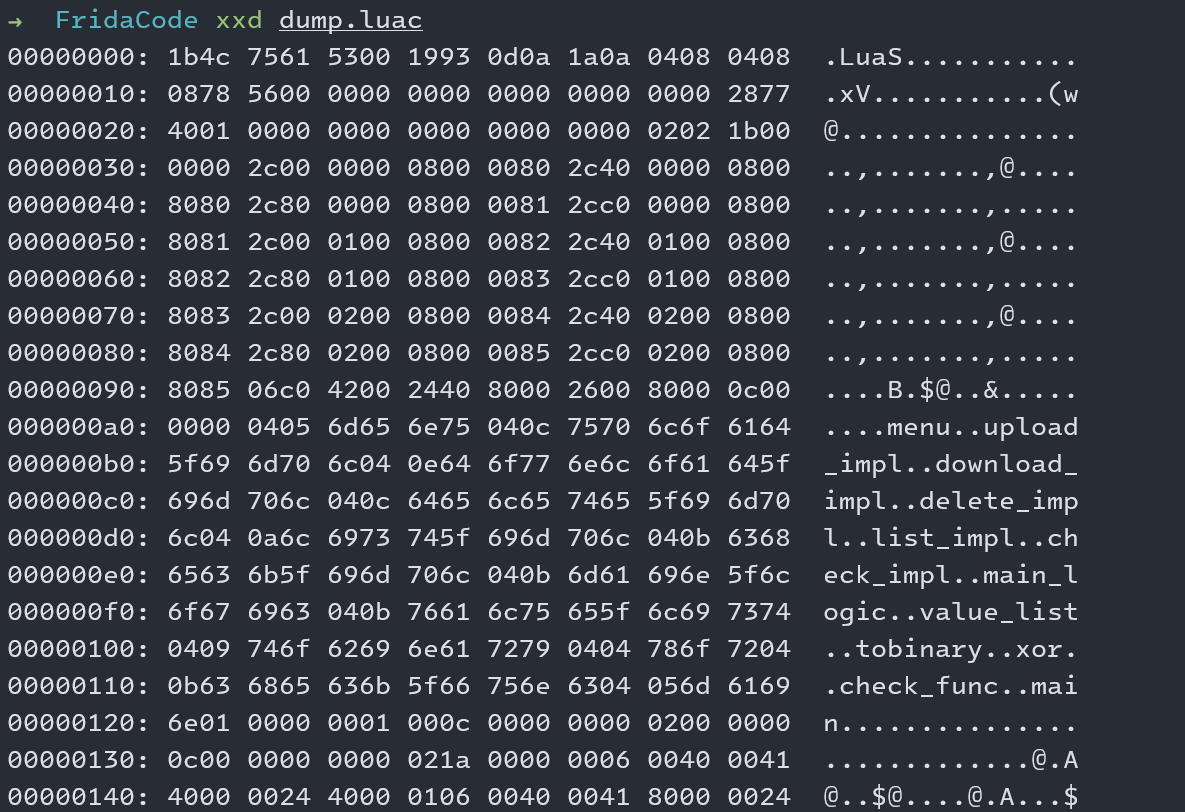
image-20231115193221718.png

unluac 一下就可以看到源码了

image-20231115193316149.png

3. VM Opcodes 顺序修改

这里以 2024 年 WMCTF easy_android 为例,这是一个 LuaJIT 的题目,且打乱了 opcode 顺序。

3.1 字符串解密

这部分和 Lua 逆向无关可以直接跳过。以这个题目为例所以还是提一下,这里因为题目的字符串加密方法基本都是以 ADRLLDARB 指令开始,所以只需要写个脚本把字符串加密函数的都执行一遍然后把 data 段 dump 出来就行了,下面是一种实现。

from idaapi import *
from idautils import Functions
from unicorn import *
from unicorn.arm64_const import *
from capstone import *
import cle

class StringDecrypt(object):
    def __init__(self):
        self.loader = cle.Loader('D:\Coding\CaptureTheFlag\libeasyandroid.so', main_opts={'base_addr': 0})
        self.mu = Uc(UC_ARCH_ARM64, UC_MODE_ARM)
        self.cs = Cs(CS_ARCH_ARM64, CS_MODE_ARM)
        self.mu.mem_map(0, 0xC0000)
        self.mu.mem_map(0x100000, 0x10000)
        for seg in self.loader.main_object.segments:
            self.mu.mem_write(seg.vaddr, self.loader.memory.load(seg.vaddr, seg.memsize))

    def decrypt(self, func):
        def hook_code(uc: Uc, address, size, user_data):
            if print_insn_mnem(address) == 'RET':
                uc.emu_stop()
        self.mu.reg_write(UC_ARM64_REG_SP, 0x100000 + 0x5000)
        self.mu.reg_write(UC_ARM64_REG_PC, func)
        self.mu.hook_add(UC_HOOK_CODE, hook_code)
        self.mu.emu_start(func, 0xC0000)

    def patch_db(self): # patch 整个数据段
        patch_bytes(0xB6EB0, bytes(self.mu.mem_read(0xB6EB0, 0x78E8)))

if __name__ == '__main__':
    funcs = Functions(0x187D0, 0xB3F00)
    string_decrypt = StringDecrypt()
    for func in funcs:
        cur_addr = func
        while print_insn_mnem(cur_addr) == 'STP' or print_insn_mnem(cur_addr) == 'STR':
            cur_addr += 4
        if print_insn_mnem(cur_addr) == 'ADRL' and print_insn_mnem(cur_addr + 8) == 'LDARB':
            print(f'Found decrypt function at 0x{func:x}')
            string_decrypt.decrypt(func)
    string_decrypt.patch_db()

3.2 如何找到每个指令的实现逻辑

LuaJIT 的虚拟机对于每条指令的实现都是用汇编实现的,通过分析可以找到指令的分发是通过 下图中的 ins_callt 实现的。

image.png

注意这三条指令,其中

add TMP1, GL, INS, uxtb #3
ldr TMP0, [TMP1, #GG_G2DISP]
br_auth TMP0

GL 是 LuaJIT 中的 Global state,可以通过 lua_State 的 glref 取得;

/* Global state, main thread and extra fields are allocated together. */
typedef struct GG_State {
  lua_State L;				/* Main thread. */
  global_State g;			/* Global state. */
#if LJ_TARGET_ARM && !LJ_TARGET_NX
  /* Make g reachable via K12 encoded DISPATCH-relative addressing. */
  uint8_t align1[(16-sizeof(global_State))&15];
#endif
#if LJ_TARGET_MIPS
  ASMFunction got[LJ_GOT__MAX];		/* Global offset table. */
#endif
#if LJ_HASJIT
  jit_State J;				/* JIT state. */
  HotCount hotcount[HOTCOUNT_SIZE];	/* Hot counters. */
#if LJ_TARGET_ARM && !LJ_TARGET_NX
  /* Ditto for J. */
  uint8_t align2[(16-sizeof(jit_State)-sizeof(HotCount)*HOTCOUNT_SIZE)&15];
#endif
#endif
  ASMFunction dispatch[GG_LEN_DISP];	/* Instruction dispatch tables. */
  BCIns bcff[GG_NUM_ASMFF];		/* Bytecode for ASM fast functions. */
} GG_State;

INS 是 opcode 的值;GG_G2DISP 是 Global state 与 dispatch表之间的偏移。

#define GG_G2DISP	(GG_OFS(dispatch) - GG_OFS(g))

所以这三条指令的意思就是 jmp dispatch[opcode] ,所以只需要拿到 GLGG_G2DISP 即可算出dispatch表的地址,找到每条指令的实现地址。这里我使用 unidbg 获取

emulator.getBackend().hook_add_new(new CodeHook() {
    @Override
    public void hook(com.github.unidbg.arm.backend.Backend backend, long address, int size, Object user) {
        long dispatchTableAddr = backend.reg_read(Arm64Const.UC_ARM64_REG_X22).longValue() + 0xF98; // f98 是 GG_G2DISP 
        for (int i = 0; i < 97; i++) {
            long dispatchAddr = ByteBuffer.wrap(backend.mem_read(dispatchTableAddr + i * 8, 8)).order(ByteOrder.LITTLE_ENDIAN).getLong();
            dispatchAddr -= dm.getModule().base;
            System.out.println("dispatchAddr " + i + " => 0x" + Long.toHexString(dispatchAddr));
        }
    }
    @Override
    public void onAttach(UnHook unHook) {}
    @Override
    public void detach() {}
}, dm.getModule().base + 0x258CC, dm.getModule().base + 0x258CD, null);

找到之后给每个分支改个名:

from idaapi import *

# rename functions
dispatch_table = [0x234b0, 0x234e8, 0x2350c, 0x23544, 0x235bc, 0x23628, 0x23670, 0x236f4, 0x23774, 0x237c4, 0x23830,
                  0x2385c, 0x23888, 0x238cc, 0x2390c, 0x2394c, 0x239fc, 0x23af8, 0x23b40, 0x23bc0, 0x23c38, 0x23c80,
                  0x23ccc, 0x23d5c, 0x23dac, 0x23e38, 0x23e5c, 0x23e7c, 0x23eac, 0x23f18, 0x23f8c, 0x24000, 0x24044,
                  0x2408c, 0x240f8, 0x24164, 0x241d0, 0x24244, 0x2428c, 0x24304, 0x24370, 0x243b8, 0x243dc, 0x243fc,
                  0x24490, 0x244f8, 0x2452c, 0x24560, 0x24580, 0x245b0, 0x245e4, 0x24654, 0x24668, 0x24720, 0x247a0,
                  0x24820, 0x248a0, 0x2492c, 0x24970, 0x249c0, 0x24a54, 0x24a90, 0x24ad8, 0x24b38, 0x24b44, 0x24b54,
                  0x24bbc, 0x24c24, 0x24c84, 0x24d28, 0x24d7c, 0x24d94, 0x24dac, 0x24e38, 0x24ef4, 0x24f94, 0x2503c,
                  0x250ac, 0x2513c, 0x251f4, 0x251f4, 0x25280, 0x25320, 0x25320, 0x25354, 0x253a0, 0x253a0, 0x253b8,
                  0x253d8, 0x25414, 0x25414, 0x25454, 0x25484, 0x25484, 0x2550c, 0x25510, 0x25558]

for i in range(len(dispatch_table)):
    set_name(dispatch_table[i], f'op_{i:02x}')

3.3 分支识别

因为 LuaJIT 的虚拟机实现是使用汇编写的,每个分支指令非常固定,一般来说大部分指令不会随着编译器版本、混淆等外界因素发生变化。因此只要提取每个分支处理逻辑的的指令序列形成指令的特征进行特征识别即可识别大部分指令。

首先,是在 Android 上编译一个 LuaJIT 这个很简单官方提供了详细的说明不再赘述,此外 LuaJIT 还提供了一个 lj_bc_ofs 其中记录了每个指令距离第一个指令处理逻辑(lj_vm_asm_begin)的偏移,可以根据这个结构大概的不准确的计算出每个指令所包含的指令。

image.png

image.png

基于此,可以先根据编译出的标准版提取出每个指令的特征,我这里简单的实现了一个提取特征的函数基本可以匹配大部分,有几个识别不到的要手动一下。

def get_feature(addr, size):
    ret = ''
    if size <= 0:
        return ret
    for inst in cs.disasm(get_bytes(addr, size), 0):
        inst: CsInsn
        if CS_GRP_JUMP in inst.groups or CS_GRP_CALL in inst.groups: # 位置相关指令操作数不作为特征
            instr_feature = inst.mnemonic
        else:
            instr_feature = inst.mnemonic + inst.op_str
        if inst.mnemonic == 'ldr': # ldr指令立即数操作数不作为特征 (不同版本的虚拟机变化一般不大,但是c语言结构体的各种偏移会有影响)
            ret += re.sub(r'#(0x)?[0-9a-f]+', '#0', instr_feature)
        else:
            ret += instr_feature
    return ret

提取特征:

lj_bc_ofs = [0x0000, 0x0080, 0x0100, 0x0180, 0x0200, 0x0284, 0x0304, 0x0354, 0x03A4, 0x0430, 0x04BC, 0x0500, 0x0544, 0x0584,
             0x05C4, 0x05FC, 0x0634, 0x0658, 0x067C, 0x069C, 0x06CC, 0x0710, 0x0758, 0x07C4, 0x0830, 0x08A4, 0x08EC, 0x0964,
             0x09D0, 0x0A3C, 0x0AB0, 0x0AF8, 0x0B70, 0x0BDC, 0x0C48, 0x0CBC, 0x0D04, 0x0D7C, 0x0DC4, 0x0E10, 0x0E3C, 0x0E68,
             0x0E8C, 0x0EAC, 0x0ECC, 0x0EFC, 0x0F30, 0x0FA0, 0x1008, 0x103C, 0x1070, 0x10AC, 0x10F4, 0x1154, 0x11A8, 0x11C0,
             0x11D8, 0x1264, 0x12F8, 0x1364, 0x13AC, 0x145C, 0x1558, 0x15E8, 0x167C, 0x16E4, 0x16F4, 0x1738, 0x1744, 0x17FC,
             0x184C, 0x190C, 0x19C8, 0x1A68, 0x1A7C, 0x1B24, 0x1B8C, 0x1BFC, 0x1C8C, 0x1D28, 0x1D44, 0x1DD0, 0x1E54, 0x1E70,
             0x1EA4, 0x1ED4, 0x1EF0, 0x1F08, 0x1F28, 0x1F48, 0x1F64, 0x1FA4, 0x1FD4, 0x1FD4, 0x205C, 0x2060, 0x20A8, 0x287C]
lj_vm_asm_begin = 0x1DEE0

feature_dic = dict()
for i in range(97):
    feature = get_feature(lj_vm_asm_begin + lj_bc_ofs[i], lj_bc_ofs[i + 1] - lj_bc_ofs[i])
    feature_dic[feature] = i
print(feature_dic)

匹配特征:

lj_bc_ofs = [0x0000, 0x0038, 0x005C, 0x0094, 0x010C, 0x0178, 0x01C0, 0x0244, 0x02C4, 0x0314, 0x0380, 0x03AC, 0x03D8, 0x041C,
             0x045C, 0x049C, 0x054C, 0x0648, 0x0690, 0x0710, 0x0788, 0x07D0, 0x081C, 0x08AC, 0x08FC, 0x0988, 0x09AC, 0x09CC,
             0x09FC, 0x0A68, 0x0ADC, 0x0B50, 0x0B94, 0x0BDC, 0x0C48, 0x0CB4, 0x0D20, 0x0D94, 0x0DDC, 0x0E54, 0x0EC0, 0x0F08,
             0x0F2C, 0x0F4C, 0x0FE0, 0x1048, 0x107C, 0x10B0, 0x10D0, 0x1100, 0x1134, 0x11A4, 0x11B8, 0x1270, 0x12F0, 0x1370,
             0x13F0, 0x147C, 0x14C0, 0x1510, 0x15A4, 0x15E0, 0x1628, 0x1688, 0x1694, 0x16A4, 0x170C, 0x1774, 0x17B8, 0x1878,
             0x18CC, 0x18E4, 0x18FC, 0x1988, 0x1A44, 0x1AE4, 0x1B8C, 0x1BFC, 0x1C8C, 0x1D28, 0x1D44, 0x1DD0, 0x1E54, 0x1E70,
             0x1EA4, 0x1ED4, 0x1EF0, 0x1F08, 0x1F28, 0x1F48, 0x1F64, 0x1FA4, 0x1FD4, 0x1FD4, 0x205C, 0x2060, 0x20A8, 0x287C]
lj_vm_asm_begin = 0x234b0

feature_dic = {}
for i in range(97):
    feature = get_feature(lj_vm_asm_begin + lj_bc_ofs[i], lj_bc_ofs[i + 1] - lj_bc_ofs[i])
    if feature in feature_dic:
        print(f'{i} => {feature_dic[feature]}')
    else:
        print(f'{i} => "not found"')

结合手动分析了几个分支的出最后的 opcode 顺序(大部分基于自动化识别,不保证正确性):

    (0x00, instructions.ISF),
    (0x01, instructions.ISTYPE),
    (0x02, instructions.IST),
    (0x03, instructions.MODNV),
    (0x04, instructions.ADDVV),
    (0x05, instructions.TGETR),
    (0x06, instructions.ISEQV),
    (0x07, instructions.ISNEV),
    (0x08, instructions.ISEQS),
    (0x09, instructions.TGETB),
    (0x0a, instructions.KSTR),
    (0x0b, instructions.KCDATA),
    (0x0c, instructions.ISNEP),
    (0x0d, instructions.ISTC),
    (0x0e, instructions.ISFC),
    (0x0f, instructions.TSETV),
    (0x10, instructions.TSETS),
    (0x11, instructions.DIVNV),
    (0x12, instructions.ISLT),
    (0x13, instructions.MODVV),
    (0x14, instructions.POW),
    (0x15, instructions.CAT),
    (0x16, instructions.TSETB),
    (0x17, instructions.ISNES),
    (0x18, instructions.ISEQN),
    (0x19, instructions.ISNUM),
    (0x1a, instructions.MOV),
    (0x1b, instructions.NOT),
    (0x1c, instructions.SUBVV),
    (0x1d, instructions.MULVV),
    (0x1e, instructions.MULVN),
    (0x1f, instructions.UNM),
    (0x20, instructions.LEN),
    (0x21, instructions.ADDVN),
    (0x22, instructions.SUBVN),
    (0x23, instructions.SUBNV),
    (0x24, instructions.MULNV),
    (0x25, instructions.DIVVN),
    (0x26, instructions.MODVN),
    (0x27, instructions.ADDNV),
    (0x28, instructions.DIVVV),
    (0x29, instructions.KSHORT),
    (0x2a, instructions.KNUM),
    (0x2b, instructions.TSETM),
    (0x2c, instructions.USETS),
    (0x2d, instructions.USETN),
    (0x2e, instructions.USETP),
    (0x2f, instructions.KPRI),
    (0x30, instructions.KNIL),
    (0x31, instructions.UGET),
    (0x32, instructions.USETV),
    (0x33, instructions.RETM),
    (0x34, instructions.CALLT),
    (0x35, instructions.ISLE),
    (0x36, instructions.ISGT),
    (0x37, instructions.ISGE),
    (0x38, instructions.ISNEN),
    (0x39, instructions.ISEQP),
    (0x3a, instructions.ITERC),
    (0x3b, instructions.TGETS),
    (0x3c, instructions.UCLO),
    (0x3d, instructions.FNEW),
    (0x3e, instructions.TNEW),
    (0x3f, instructions.CALLMT),
    (0x40, instructions.CALLM),
    (0x41, instructions.RET0),
    (0x42, instructions.TSETR),
    (0x43, instructions.CALL),
    (0x44, instructions.ITERN),
    (0x45, instructions.TDUP),
    (0x46, instructions.GGET),
    (0x47, instructions.GSET),
    (0x48, instructions.TGETV),
    (0x49, instructions.VARG),
    (0x4a, instructions.ISNEXT),
    (0x4b, instructions.RET),
    (0x4c, instructions.RET1),
    (0x4d, instructions.FORI),
    (0x4e, instructions.JFORI),
    (0x4f, instructions.FORL),
    (0x50, instructions.IFORL),
    (0x51, instructions.JFORL),
    (0x52, instructions.ITERL),
    (0x53, instructions.IITERL),
    (0x54, instructions.JITERL),
    (0x55, instructions.LOOP),
    (0x56, instructions.ILOOP),
    (0x57, instructions.JLOOP),
    (0x58, instructions.JMP),
    (0x59, instructions.FUNCF),
    (0x5a, instructions.IFUNCF),
    (0x5b, instructions.JFUNCF),
    (0x5c, instructions.FUNCV),
    (0x5d, instructions.IFUNCV),
    (0x5e, instructions.JFUNCV),
    (0x5f, instructions.FUNCC),
    (0x60, instructions.FUNCCW)

对于 LuaJIT 的反编译~~一般使用 luajit-decompiler 这个项目,~~但是这个项目中对于 opcode 的分类全是基于标准 opcode 直接的数值关系做的,所以修起来很难受,总之就是把所有的大于小于判断替换成对应的 in (x, y, z….) 最终反编译的结果是这样的,感觉哪里错了,也解不出来 flag,我也懒得分析了,大概就是这样。

jit.off()

slot0 = require("bit")

function BBB(slot0)
	slot1 = {}
	slot2 = #slot0

	for slot6 = 1, #slot0 do
		table.insert(slot1, string.format("%02x", uv0.bxor(218, string.byte(slot0, slot6))))
	end

	return table.concat(slot1)
end

function CCC(slot0, slot1)
	slot2 = {}

	for slot6 = 1, #slot0, 2 do
		table.insert(slot2, string.char(uv0.bxor(tonumber(slot0:sub(slot6, slot6 + 2 - 1), 16), slot1 or 218)))
	end

	return table.concat(slot2)
end

function AAA(slot0, slot1)
	slot2 = {
		[slot6] = slot6 - 1
	}

	for slot6 = 1, 256 do
	end

	for slot7 = 1, 256 do
		slot3 = (0 + slot2[slot7] + string.byte(slot0, slot7 % #slot0 + 1)) % 256
		t = slot2[slot7]
		slot2[slot7] = slot2[slot3 + 1]
		t = slot2[slot3 + 1]
	end

	slot11 = "."

	for slot11 in slot1:gmatch(slot11), nil,  do
		slot4 = (1 + 1) % 256
		slot5 = (0 + slot2[slot4 + 1]) % 256
		t = slot2[slot4 + 1]
		slot2[slot4 + 1] = slot2[slot5 + 1]
		slot2[slot5 + 1] = t
		slot14 = uv0.bxor(string.byte(slot11), slot2[(slot2[slot4 + 1] + slot2[slot5 + 1]) % 256 + 1])
		slot7 = "" .. string.format("%02x", slot14)
		slot6 = "" .. string.char(slot14)
	end

	return slot7
end

function DDD()
	return "ca3f7e84a61b756c457eec122b9320feed15069ab19c84d9bf1d3f78178b0eaabf16a7fa8"
end

function checkflag(slot0)
	if AAA(BBB("8d97998e9ce8eae8ee"), slot0) == DDD() then
		return 1
	end

	return 0
end

后面得知,问题是 luajit-decompiler 项目导致的,使用luajit-decompiler-v2 即可

https://github.com/marsinator358/luajit-decompiler-v2

jit.off()

local var_0_0 = require("bit")

function BBB(arg_1_0)
	local var_1_0 = {}
	local var_1_1 = #arg_1_0

	for iter_1_0 = 1, #arg_1_0 do
		local var_1_2 = string.byte(arg_1_0, iter_1_0)
		local var_1_3 = var_0_0.bxor(218, var_1_2)

		table.insert(var_1_0, string.format("%02x", var_1_3))
	end

	return table.concat(var_1_0)
end

function CCC(arg_2_0, arg_2_1)
	local var_2_0 = {}

	arg_2_1 = arg_2_1 or 218

	for iter_2_0 = 1, #arg_2_0, 2 do
		local var_2_1 = arg_2_0:sub(iter_2_0, iter_2_0 + 2 - 1)
		local var_2_2 = tonumber(var_2_1, 16)
		local var_2_3 = var_0_0.bxor(var_2_2, arg_2_1)

		table.insert(var_2_0, string.char(var_2_3))
	end

	return table.concat(var_2_0)
end

function AAA(arg_3_0, arg_3_1)
	local var_3_0 = {}

	for iter_3_0 = 1, 256 do
		var_3_0[iter_3_0] = iter_3_0 - 1
	end

	local var_3_1 = 0

	for iter_3_1 = 1, 256 do
		var_3_1 = (var_3_1 + var_3_0[iter_3_1] + string.byte(arg_3_0, iter_3_1 % #arg_3_0 + 1)) % 256
		var_3_0[iter_3_1], var_3_0[var_3_1 + 1] = var_3_0[var_3_1 + 1], var_3_0[iter_3_1]
	end

	local var_3_2 = 1
	local var_3_3 = 0
	local var_3_4 = ""
	local var_3_5 = ""

	for iter_3_2 in arg_3_1:gmatch(".") do
		var_3_2 = (var_3_2 + 1) % 256
		var_3_3 = (var_3_3 + var_3_0[var_3_2 + 1]) % 256
		var_3_0[var_3_2 + 1], var_3_0[var_3_3 + 1] = var_3_0[var_3_3 + 1], var_3_0[var_3_2 + 1]

		local var_3_6 = var_3_0[(var_3_0[var_3_2 + 1] + var_3_0[var_3_3 + 1]) % 256 + 1]
		local var_3_7 = var_0_0.bxor(string.byte(iter_3_2), var_3_6)
		local var_3_8 = string.format("%02x", var_3_7)

		var_3_5 = var_3_5 .. var_3_8
		var_3_4 = var_3_4 .. string.char(var_3_7)
	end

	return var_3_5
end

function DDD()
	return "ca3f7e84a61b756c457eec122b9320feed15069ab19c84d9bf1d3f78178b0eaabf16a7fa8"
end

function checkflag(arg_5_0)
	local var_5_0 = BBB("8d97998e9ce8eae8ee")

	if AAA(var_5_0, arg_5_0) == DDD() then
		return 1
	end

	return 0
end

return

3.4 求解

虽然解不出来,但是流密码直接 hook bxor 实现把密钥流拿一下就行,bit 库的实现在lib_bit.c 这个文件,里面没有 bit_bxor 的实现,实现就在汇编里。

LJLIB_ASM_(bit_bor)		LJLIB_REC(bit_nary IR_BOR)
LJLIB_ASM_(bit_bxor)		LJLIB_REC(bit_nary IR_BXOR)

image.png

直接搜一下指令序列找到之后 hook 即可。

emulator.getBackend().hook_add_new(new CodeHook() {
    @Override
    public void hook(Backend backend, long address, int size, Object user) {
        long RA = backend.reg_read(Arm64Const.UC_ARM64_REG_W0).longValue() & 0xffffffffL;
        long RB = backend.reg_read(Arm64Const.UC_ARM64_REG_W8).longValue() & 0xffffffffL;
        System.out.println("\tRA=" + Long.toHexString(RA) + ", RB=" + Long.toHexString(RB));
    }
    @Override
    public void onAttach(UnHook unHook) {}
    @Override
    public void detach() {}
}, dm.getModule().base + 0x26AFC, dm.getModule().base + 0x26AFC, null);

4. 后记

对于 Lua 的指令opcode的识别,相对来说更加复杂。但是如果没有混淆在解释器中的话,可以通过 DIE 等工具尽可能的识别编译器的确切版本、编译参数等外界因素来进行类似的识别,柏鹭杯中的那个题我就曾使用这种方法成功实现识别,但是当时未能及时记录,时间过了好久也懒得重新写了。

除了这些,我博客中对于 2023 年巅峰极客 ezlua 的复现过程,也是学习 LuaJIT 的较好的资料。

https://www.cnblogs.com/gaoyucan/p/17577858.html